

2.3 Configuration Steps
Basic configuration consists of a series of logical steps. Use the Configuration Manager to complete these steps. The Configuration Manager is an interface between your RFC’s configuration on the local CHPS Master Controller and the local datastore.
Instructions: Click each of the components and steps in the configuration process for a description. Click the list of steps for a larger view.
The Configuration Manager is a graphical user interface (GUI) designed to simplify your role as focal point. This GUI allows you to download the current configuration from the Central Database and upload them again once you have edited them. The local datastore in your OC directory will have a copy of these configuration files and the data needed in FEWS.
Click here for an optional presentation on the Configuration Manager. (Note: This presentation opens in a new window.)
Use the following job sheet to learn how to use the Configuration Manager.
Job Sheet: Using the Configuration Manager
4. Import:
Back in the Configuration Manager now, import the file from the location you just saved it. This should be in the appropriate configuration directory with the rest of the configuration files. This will bring your changed configuration file to your lds.
5. Upload:
The final step ensures your changes are not lost. You must upload your changed and validated file to the Central Database. If you do not, your changes will not be pushed to the OC and your files will be overwritten when you launch FEWS.
Locate the Config files you are editing on your local file system.
3. Edit XML
Edit your configuration file, using an XML editor, according to the changes you are testing in your SA. Remember, you should not be completing this process if you have not tested your configuration changes on your SA first! When editing is complete, save the file in an appropriate configuration directory.
2. Export:
After selecting the file you wish to edit, you need to export the file to a file editor. While it may seem like the term “export” is misused here, think of it as if you are sending the file out for editing.
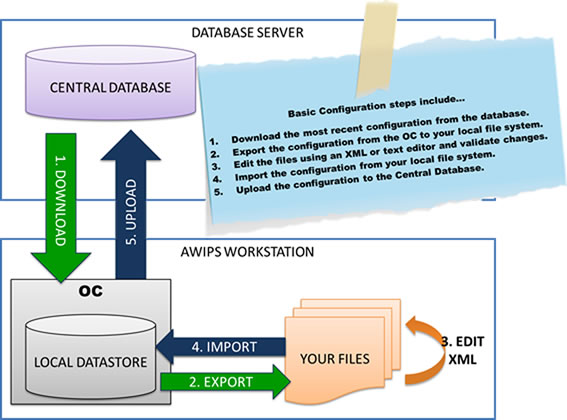
Basic Config Steps
- Download the most recent configuration in the database.
- Export the configuration from the OC to your local file system.
- Edit the files using an XML or text editor and validate changes.
- Import the configuration from your local file system.
- Upload the configuration to the Central Database.